
Pickled Garlic Recipe
Introduction
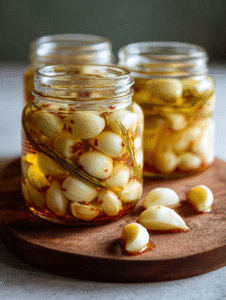
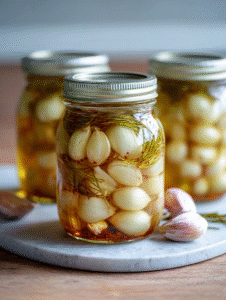
Crisp, aromatic, and pleasantly tangy, Pickled Garlic Recipe transforms sharp raw cloves into mellow, flavorful gems you’ll crave on everything. This simple preservation method softens garlic’s bite while adding a bright vinegar snap that wakes up salads, sandwiches, and roasted meats. Whether you’re building a charcuterie board or elevating weeknight dinners, this recipe delivers bold flavor with minimal effort. You’ll learn how to prepare, pickle, and store garlic safely for maximum taste and crunch.
Why You’ll Love This Recipe
This Pickled Garlic Recipe stands out because it balances bold flavor with surprising smoothness. The cloves keep a gentle crunch while the brine infuses them with tangy, slightly sweet notes. Unlike raw garlic, pickled cloves taste mellow and complex, which makes them perfect for snacking straight from the jar.
You’ll also appreciate how easy this recipe feels. No complicated equipment or advanced canning skills are required. You peel, simmer the brine, pour, and wait. That’s it. The contrast between crisp garlic and sharp vinegar creates a vibrant pop in every bite.
This recipe fits beautifully into meal prep routines. Add cloves to salads, blend them into dressings, or stir them into garlic pasta with bacon for a punchy upgrade. Once you try homemade pickled garlic, store-bought jars simply won’t compare.
Ingredients
To prepare this Pickled Garlic Recipe, gather the following ingredients:
-
2 cups (about 3 large heads or 300 g) fresh garlic cloves, peeled
-
1 cup (240 ml) white vinegar (5% acidity for safe pickling)
-
1 cup (240 ml) filtered water
-
1 tablespoon (18 g) kosher salt
-
1 tablespoon (12 g) granulated sugar
-
1 teaspoon black peppercorns
-
1/2 teaspoon red pepper flakes (optional for heat)
-
2 bay leaves
-
1 small sprig fresh thyme or rosemary (optional)
Choose firm, unblemished garlic for the best texture. White vinegar keeps the flavor clean and bright, while sugar balances acidity. Whole spices slowly infuse the brine and add subtle complexity.
Pro Tips
First, always use fresh garlic. Avoid soft or sprouting cloves because they turn mushy during pickling. Fresh cloves keep their snap and absorb flavor evenly.
Second, gently blanch the garlic for 30 seconds in boiling water before pickling if you prefer a milder taste. This step softens the harsh edge without sacrificing texture.
Third, ensure the brine fully covers every clove. Exposure to air can cause discoloration or uneven flavor. Press cloves down gently and remove air bubbles by tapping the jar lightly on the counter.
Finally, allow at least one week of resting time. The flavor deepens significantly after seven days and reaches peak balance around two weeks.
Instructions
Step 1
Peel the garlic cloves carefully. Trim off the tough root ends but keep each clove intact. Rinse them under cool water and pat completely dry with a clean towel.
Step 2
Sterilize a glass jar by washing it in hot soapy water and rinsing thoroughly. Let it air-dry or place it in a low oven for a few minutes to remove moisture.
Step 3
Place the garlic cloves, peppercorns, bay leaves, and optional herbs into the jar. Pack them snugly but avoid crushing the cloves.
Step 4
In a small saucepan, combine white vinegar, water, kosher salt, and sugar. Bring the mixture to a gentle boil over medium heat. Stir until the salt and sugar dissolve completely. This creates the flavorful brine that defines your Pickled Garlic Recipe.
Step 5
Carefully pour the hot brine over the garlic until fully submerged. Leave about 1/2 inch (1.25 cm) of headspace at the top. Tap the jar gently to release trapped air bubbles.
Step 6
Seal the jar tightly with a lid. Allow it to cool to room temperature on the counter. Once cooled, refrigerate immediately.
Step 7
Let the garlic pickle for at least 7 days before tasting. The cloves will gradually turn slightly golden and develop a balanced tangy-sweet flavor. After two weeks, the taste becomes richer and more rounded.
Variations
For a spicy kick, increase red pepper flakes or add sliced jalapeños. This creates a bold version perfect for tacos and grilled meats.
If you prefer subtle sweetness, substitute apple cider vinegar for half the white vinegar. The fruitier note pairs beautifully with roasted vegetables and even complements dishes like garlic butter shrimp pasta.
For an herby Mediterranean twist, add oregano, coriander seeds, and lemon zest. These flavors shine in antipasto platters and bright salads.
You can also experiment with honey instead of sugar for a softer sweetness that blends well with roasted red pepper and spinach dishes.
Storage and Serving
Store your jar in the refrigerator at all times. Properly refrigerated, this Pickled Garlic Recipe stays fresh for up to 3 months. Always use a clean utensil when removing cloves to maintain quality.
Serve pickled garlic chopped into salads, blended into vinaigrettes, or layered in sandwiches. Toss sliced cloves into warm garlic pasta with bacon or stir them into creamy dips for added zing.
They also shine on cheese boards, alongside olives and cured meats. The tangy crunch cuts through rich flavors and refreshes the palate between bites.
FAQs
1. Does pickled garlic lose its strong flavor?
Yes, the pickling process mellows the sharp bite and replaces it with tangy sweetness.
2. Why did my garlic turn blue?
Garlic sometimes reacts with vinegar and minerals, creating a blue tint. It remains safe to eat.
3. Can I use apple cider vinegar instead of white vinegar?
Absolutely. It adds a slightly fruity depth while maintaining proper acidity.
4. How long before I can eat it?
Wait at least 7 days. Two weeks delivers the best flavor balance.
5. Can I store it at room temperature?
No. Keep it refrigerated unless you follow certified pressure-canning methods.
Conclusion
This [Roasted Red Pepper, Spinach, and Mozzarella Stuffed Chicken] is comfort food at its finest — but this Pickled Garlic Recipe is bold flavor at its brightest. It’s the kind of dish that transforms simple meals into vibrant experiences and gives everyday cooking a gourmet touch.

Pickled Garlic Recipe
Ingredients
2 cups garlic cloves, peeled
1 cup white vinegar
1 cup water
1 tablespoon kosher salt
1 tablespoon granulated sugar
1 teaspoon black peppercorns
1/2 teaspoon red pepper flakes
2 bay leaves
1 sprig fresh thyme or rosemary
Instructions
- Peel garlic cloves and trim root ends.Sterilize a clean glass jar with hot soapy water and rinse well.Place garlic, peppercorns, bay leaves, and herbs into the jar.In a saucepan, bring vinegar, water, salt, and sugar to a gentle boil and stir until dissolved.Pour hot brine over garlic until fully submerged.Seal the jar and cool to room temperature.Refrigerate for at least 7 days before serving.